How to Adjust Your Kitchen Doors
It’s not uncommon for even the best quality hinges to need adjusting occasionally to retain those perfect gaps between your kitchen doors. In the video below we walk you through the 3 simple steps to adjusting your kitchen doors so that they look just as good as they day they were fitted…
The ‘Basics’ Of Adjusting Your Doors
Look at a door and decide if it requires adjustment. Maybe it doesn’t look level; there maybe is a bigger gap at one end and a smaller gap at the other. The most common adjustment you need to make, is between two adjoining doors. Either moving them closer together or further apart. This same adjustment is used to align a door with the edge of the cabinet.
How To Move The Door Side to Side
The front screw on the hinge is normally used to adjust door alignment, or in other words, the distance that the door overlays the cabinet. This is the screw that will open up or close the gap between itself and the adjacent door. Turning the screw clockwise will cause the door to move to the right, therefore closing the gap between itself and the door to the right.
Alternatively, turning the screw ant-clockwise will cause the door to move to the left, closing the gap between itself and the door to the left or increasing the gap with the door to the right.
Once all of the doors are aligned with the gaps even and vertical betwwen each door it’s time to align the tops and bottoms of the doors by moving them up or down…
How To Move The Door Up Or Down
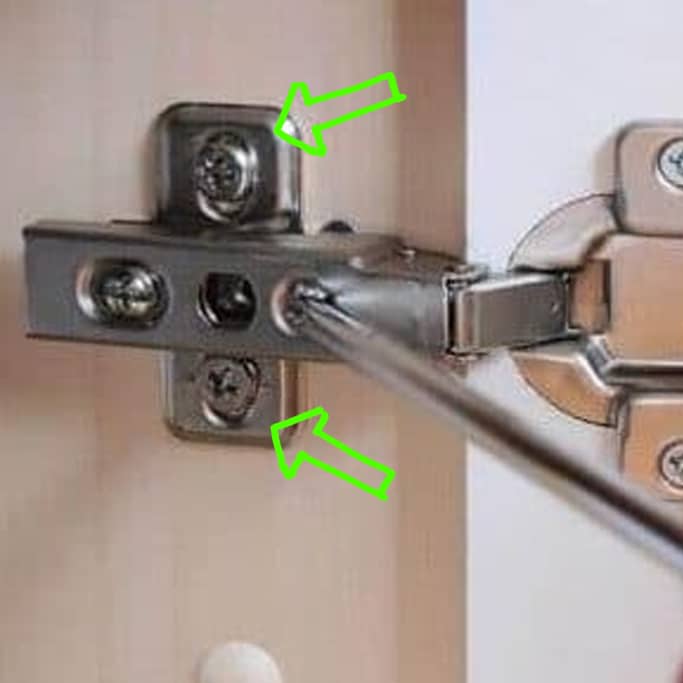
The second adjustment, located on the backplate, allows you to move the door up and down.
Depending on which type of hinge you have this adjustment will be carried out as follows

If your kitchen hinges have 2 x screws on the back plate the the one pictured here then the height of the door can be adjusted by loosening both screws by a couple of turns at most.This will allow the back plate to move up or down which will move the door laterally up or down… If when you loosen those screws off, the back plate is a little bit stiff, you can just tap the back plate very gently with a hammer and that will loosen it off allowing you to then move the back plate up and down. There is quite a lot of adjustment in the back plate to allow you to do that.
Once you have moved the hinges up or down to the desired position simply tighten the screws back up.
NOTE: Be careful not to over tighten as this will cause the material that surrounds the screw to break out and you will no longer be able to tighten the back plate onto the carcase sufficiently to support the door.

If your kitchen hinge has 3 x screws on the back plate, like the one pictured, the door is simply raised and lowered by turning the 3rd (extra) screw in either direction.
This is a much better solution because it means that once the hinge is fixed to the carcase in the factory the fixing screws never have to be loosened or adjusted.
This means that the hinges will always be fastened securely to the cabinets, ultimately prolonging the life of your kitchen
Moving The Door Closer To The Cabinet
The third adjustment moves the door further to or away from the cabinet. You don’t normally need to adjust this as once it has been set by the installer and all of the doors are closing flat to the carcase they will rarely need adjusting.
If adjustment is required, try not to have the door too tight or too close to the cabinet because when you open the door it will ‘bind’ against the cabinet and then you won’t be able to open or close the door very easily.
You may find if your door won’t shut properly and it seems to be binding then this is the adjustment you need to make.
READY TO TRANSFORM
YOUR KITCHEN?
READY TO TRANSFORM
YOUR KITCHEN?
Watch TV’s Francis Donovan explain why we might just be the perfect partners for your dream kitchen.
Watch TV’s Francis Donovan explain why we might just be the perfect partners for your dream kitchen.
Free Design Service
FREE – No Obligation Quote
Complete Kitchens From £12k
Book Your Consultation Online


